- Get link
- X
- Other Apps
Having a website is
critical to the success and growth of any business. GoDaddy allows business
owners and entrepreneurs to design and deploy a website without incurring
website hosting costs or through tiresome domain registration processes.
The website builder offers a one-month
trial period, and you can build your website and test GoDaddy’s features and
functionalities before upgrading your membership.
GoDaddy is suitable for newbies without
programming knowledge. You can create a website or use its Artificial Design
Intelligence to make your site and customize it to suit your needs.
One of the Caveats of using GoDaddy is
the web page builder lacks features and has a simple look compared to website
builders like Wix, Weebly, and systeme.io. You won’t get an advanced site when
using GoDaddy, but you will get a simple web page within minutes.
I’ll walk you through the setup
process, how to personalize your website, and the steps you must follow before
launching your site on the world wide web.
How to Build a
Website on GoDaddy Step-by-Step Tutorial
Step 1.) Create an
Account
Before starting your web design
journey, you’ll have to create an account with GoDaddy to build a web page on
their platform.
Listed below are the steps to follow
when creating an account on GoDaddy:
- Visit
GoDaddy
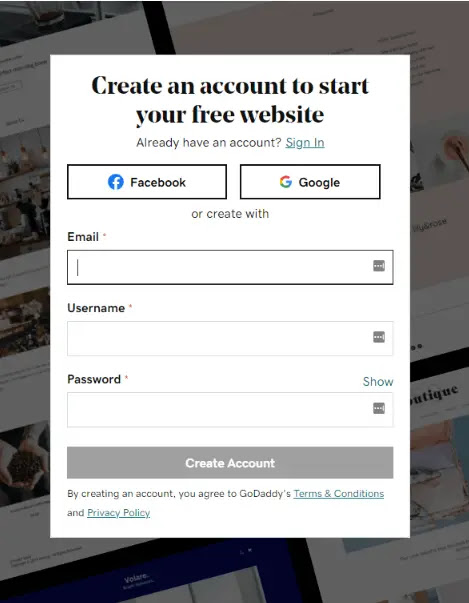
- Click
on create an account and use your Google account, Facebook details, or
email address to open an account.
- Select
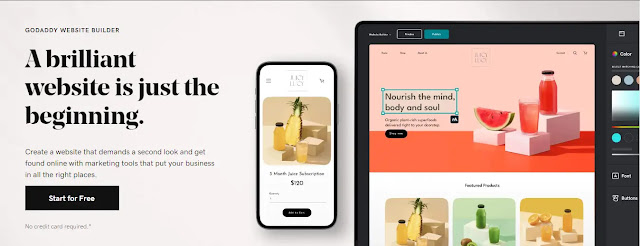
start for free to take advantage of their free trial offer. GoDaddy boasts
a generous one-month free trial period, giving you enough time to
ascertain whether the site builder is excellent for your business.
Once your trial period ends, you’ll
have to pay between $9.99 - $24.99/month, depending on your needs. The basic
plan gives you access to all the essential features like SSL security. For SEO
tools, you’ll need to part with $14.99 monthly.
Their eCommerce plan is the most
expensive but grants you access to features like shipping, inventory
management, and discounts. It’s priced at $24.99 per month.
It’s important to note that the free
plan contains GoDaddy’s domain, and you’ll have to upgrade your membership to a
paid plan for a custom domain, which is advised if you want to have a reputable
and trustworthy brand online.
Step 2.) Choose a
Website Name and Industry
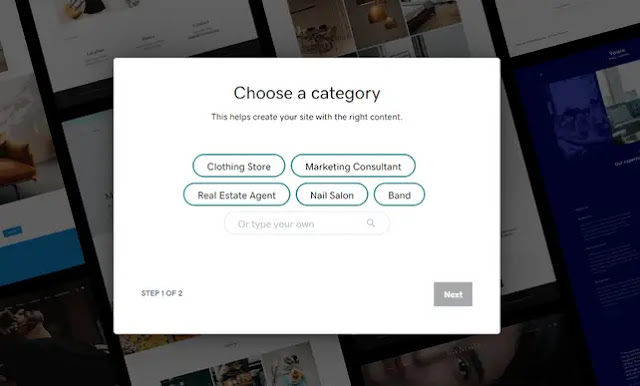
After creating an account, it’s time to
select an industry/category from the options available on the web page builder.
If GoDaddy doesn’t have your industry category, you can choose a similar
industry to your niche.
Ensure you choose the appropriate
business category because GoDaddy recommends templates based on the industry
selected.
Once you’ve chosen your industry,
selecting your website’s name comes next. You don’t have to waste time picking
a name for your brand, as you can always change your name later.
Step 3.) Choose a
Theme For Your Sample Homepage
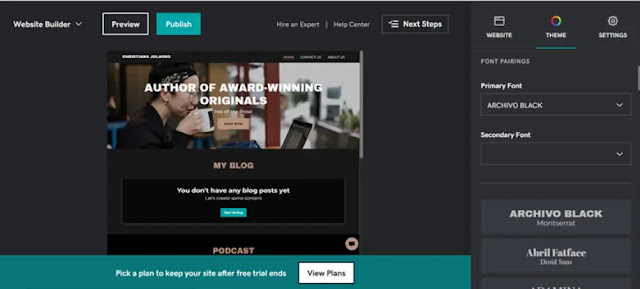
You can choose and edit a theme from
scratch or use the builder’s base theme layout of your business category
selected and personalize it to match your brand color palette.
Add and edit components such as images,
texts, and videos.
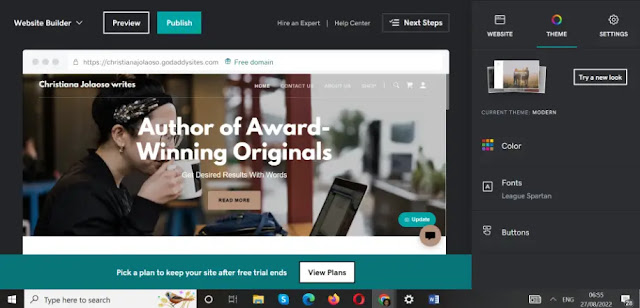
To switch between themes, click the
Template button in the upper-right corner of GoDaddy’s dashboard. Then, select
Try a New Theme to view additional templates. Since changing the fonts,
buttons, and colors is possible, you can opt for any theme that blends with
your brand.
To activate your theme, click the
Select button in the lower-left corner of your editor dashboard.
Step 4.) Personalize
Your Website
GoDaddy has various templates generated from your chosen business category. However, you’ll have to design the sections, pages, texts, and images to launch a site that meets your brand’s requirements.
Add Images
To add images to your web page, click
the Update button to the right of the picture. The platform has high-quality
stock images you can use or import photos from social media or your computer.
Add alt text to describe your images to
search engines and users. Using keywords is paramount because they’ll help
increase your page’s SEO ranking. You can also edit your photos by cropping and
adding effects and filters.
If you have a business logo, you can
add it to your website. Click on your site’s name, and Create a Logo or Upload
button to select a logo from your device.
Add Text
Click on the sample text to delete,
highlight, or write your own. Several text editing options exist, spanning from
bold to italics, bullets, numbered lists, and text size.
You can’t add new text boxes to your
page, as the platform doesn’t allow users to drag and click text boxes. GoDaddy
only permits users to add new sections and change the text that goes along with
it.
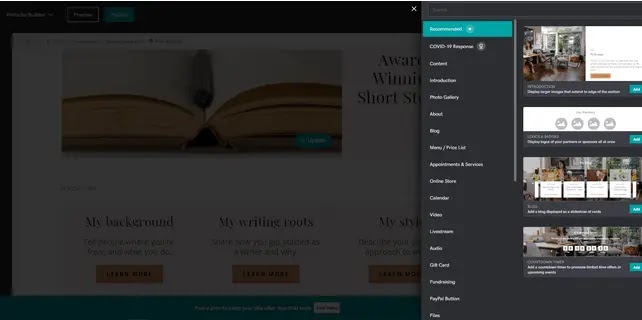
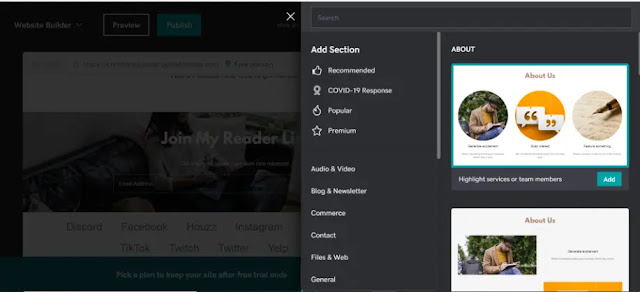
Add New Sections
Your site has several sections,
including About Us, Contact Us, Privacy Policy, Header, and Terms and
Conditions. You can add features like blogs, calendars, menus, social feeds,
photo galleries, and videos to make it distinctive.
GoDaddy permits users to add up to 20
sections per web page and change elements in the footer and header areas.
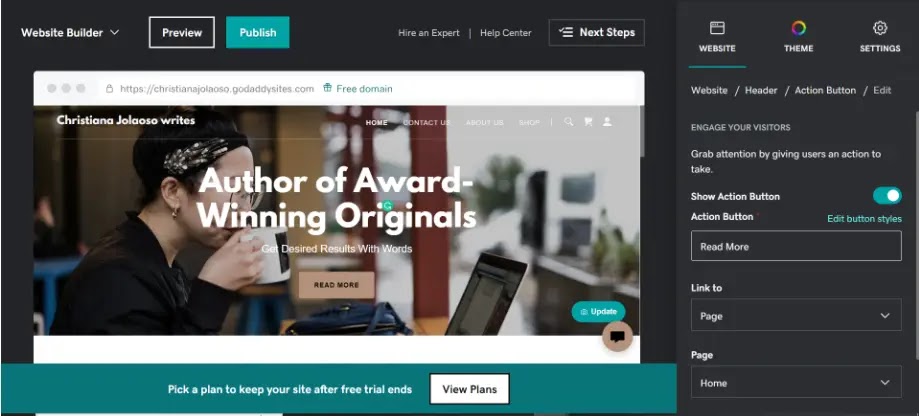
To change a headline or subleader,
click on the pre-existing text. To replace the header image, click on the Cover
Media button, then click on Change image to add a picture of your choice from
the stock image collection or your computer.
You can also change your call-to-action
button, edit the link to a website and the CTA text, and readjust the CTA
button.
Remember to update your footer with
links to social media accounts, privacy policy, and terms of service because
site visitors expect to find this information.
Click on Accent to enter information
about your business and change the background color of your footer. Link your
social accounts by clicking on Social Accounts.
Add Pages
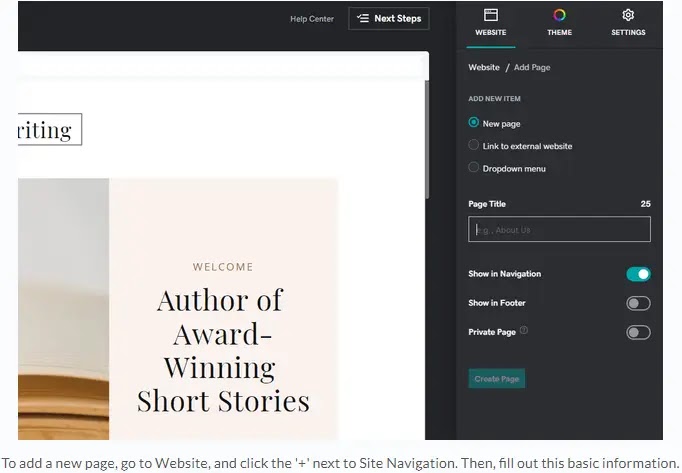
It’s essential to create a page
structure that suits your brand’s needs after including images and texts in different
sections of your web page. Click on Website in the upper-right corner of the
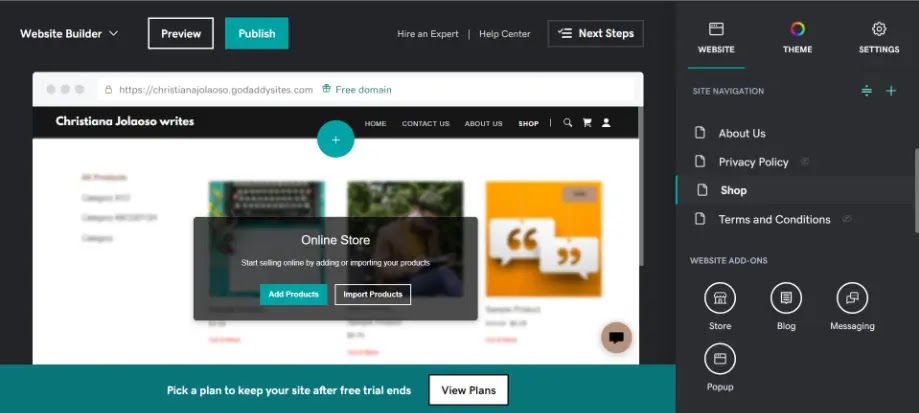
interface dashboard, and you’ll get a sample glimpse of how pages should be
structured.
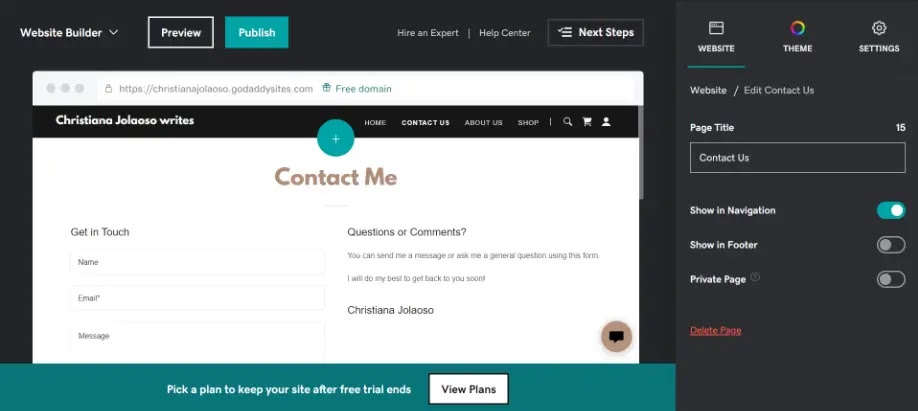
Click on the Site Navigation menu, then
click the (+) icon to add new images. You can add drop-down menus and external
links, and rename, delete, and clone created pages. To reorganize the completed
pages, click the icon beside the (+).
The web builder also makes it possible
to gate off content for specific users requiring them to have a link, account,
or code to gain access.
Step 5.) Manage Your
Website’s Settings
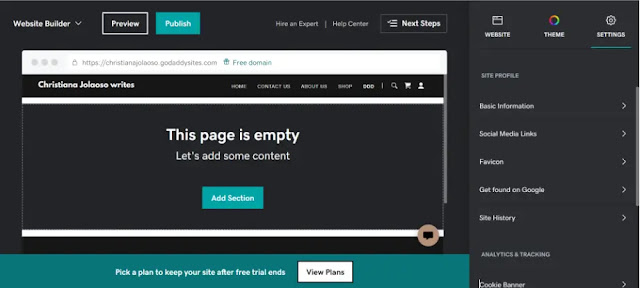
You can access your site’s tracking and
profile features by clicking on the Settings tab. You can enable or disable
your website’s features and add new features according to your needs.
Website Profile
- Basic
Information – Fill in your email address, site name,
physical address, and phone number.
- Social
Media Links – Connect your social accounts like
Instagram, LinkedIn, TikTok, Pinterest, Facebook, Discord, and Yelp.
- Get
Found on Google – You can optimize your
website for keywords, and GoDaddy will recommend keywords to rank on
search engines like Bing.
- Favicon –
Upload an image you’d want website visitors to see next to the site’s
name.
- Website
History – Access saved drafts of edits to your
website.
Tracking and
Analytics
Amending this setting will help you
make the most of Pinterest, Facebook, and Google AdSense by helping you analyze
and track your website visitors’ interests. Setting up cookie banners to inform
site visitors that your page uses cookies is also advisable.
Step 6.) Enhance Your
Web Page
GoDaddy has advanced features and
functionalities like pop-ups, appointment scheduling, and social media
integration. Users can also customize domains and run eCommerce stores.
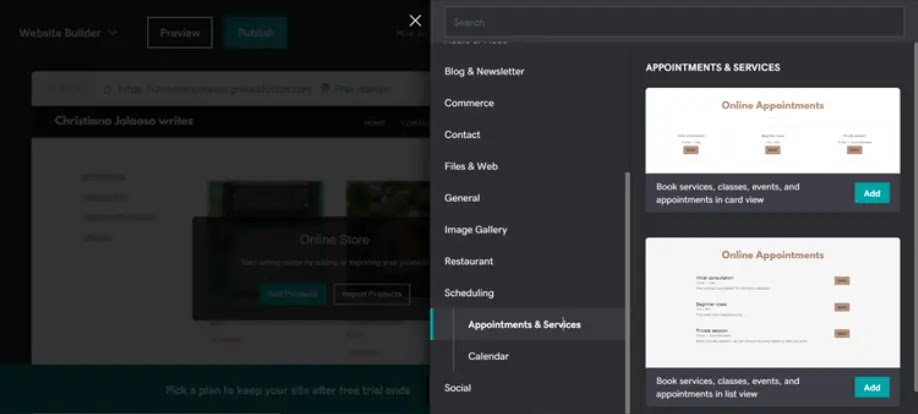
To set up the appointment scheduling
feature, click on services below the Website tab. Include price details,
images, Zoom integration, and staff availability. After filling in all the
required information, click the Save button.
Integrating your social media accounts
is recommended here by adding buttons that direct website visitors to social
media pages.
If you wish to run an eCommerce store,
GoDaddy enables users to add product sizes, names, descriptions, categories,
and shipping information. You can find this information from eBay or import it
from a CSV file.
Step 7.) Preview and
Publish Your Site
Before launching your site, it’s
essential to preview how it’ll look on various devices like tablets, mobile
phones, and desktops. Confirm that all the information on your contact page is
accurate and correct, and also look out for broken links and typos.
If everything is correct, the website
looks appealing, and you are comfortable launching it under GoDaddy’s
subdomain, you can publish your site and go live.
Step 8.) Customize
Your Domain
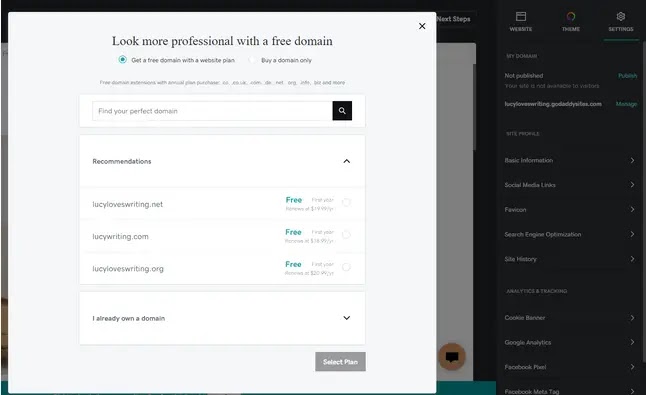
To publish your web page on a custom
domain, you must buy a domain from GoDaddy or connect to a pre-existing domain
name.
For those using a domain from another
service, select I already have a domain, then choose I have a domain from
another provider.
Final Remarks: How to
Build a Website on GoDaddy
I have covered all the steps necessary
to create and deploy your GoDaddy site, from creating a free account to setting
up and previewing your page.
It may seem tiresome, but thanks to
GoDaddy’s intuitive design and drag-and-drop editor, suitable for beginners,
you can create a simple site within minutes.
If GoDaddy doesn’t appeal to your
business, try out systeme.io since it works similarly to
GoDaddy and offers additional features and functionalities. It’s considered an
all-in-one marketing suite, and more than 350,000 entrepreneurs and startups
use it.
How to Build a
Website on GoDaddy – Frequently Asked Questions (FAQs)
How much are the hosting fees on
GoDaddy?
Depending on the hosting type, prices
range between $3.99 and $129.99 monthly. Some of the hosting options include the
following:
- WordPress
Hosting
- Business
Hosting
- Shared
Hosting
- Dedicated
server hosting
- VPS
Hosting
Does GoDaddy offer reliable customer
support?
If you have an inquiry, you can contact
GoDaddy’s customer service team via live chat support from Monday to Friday.
You can also reach them on the phone.
Does GoDaddy include hosting in its
package?
When you create a website on the
platform, you’ll enjoy hosting services that are dedicated and shared hosting
that can be used seamlessly with other websites such as Drupal, Joomla, and
WordPress.
Can I manage my site on mobile?
You can organize, manage, and update
your website from your mobile, making running your site on the move convenient.
Alternative Reading: Unbounce Alternatives – 9 Pocket-Friendly Options
Disclaimer: Some of the links contained
in the blog post are affiliate links and I might receive commissions. Thank You👍
- Get link
- X
- Other Apps


Comments
Post a Comment